Showing posts with label Adaptations. Show all posts

Wednesday, 15 July 2015

Vintage Pledge Pinafore Complete!

Aloha folks! How is your day going? I have finally reached the end of the five thousand social engagements that have taken up my every weekend for the past six weeks. I'm pretty tired, but only have a week and a half of work left so am looking forward to finally taking a moment off before Spud arrives! 

This weekend my plan is to potter, finally make those dresses I needed for work.... so I can wear them in my last week (oops) and sit with my feet up for a bit. We had a baby shower over the weekend, and showed off the nursery to family and friends. I managed to stay up til 2.30am! Pretty chuffed with that as my last hoorah for a while ha ha. 

Today I'm showing you my stretch denim pinafore, made from vintage pattern Style 1156, this is the first ever vintage pattern I have ever used! Can you believe it? People are always saying I have a vintage style, I like to think I like everything and that's why I have a bit of a vintage aesthetic. 

Therefore I have completed my #vintagepledge for 2015, to actually sew an original vintage pattern! Im pretty sure that this is from the '70s. 


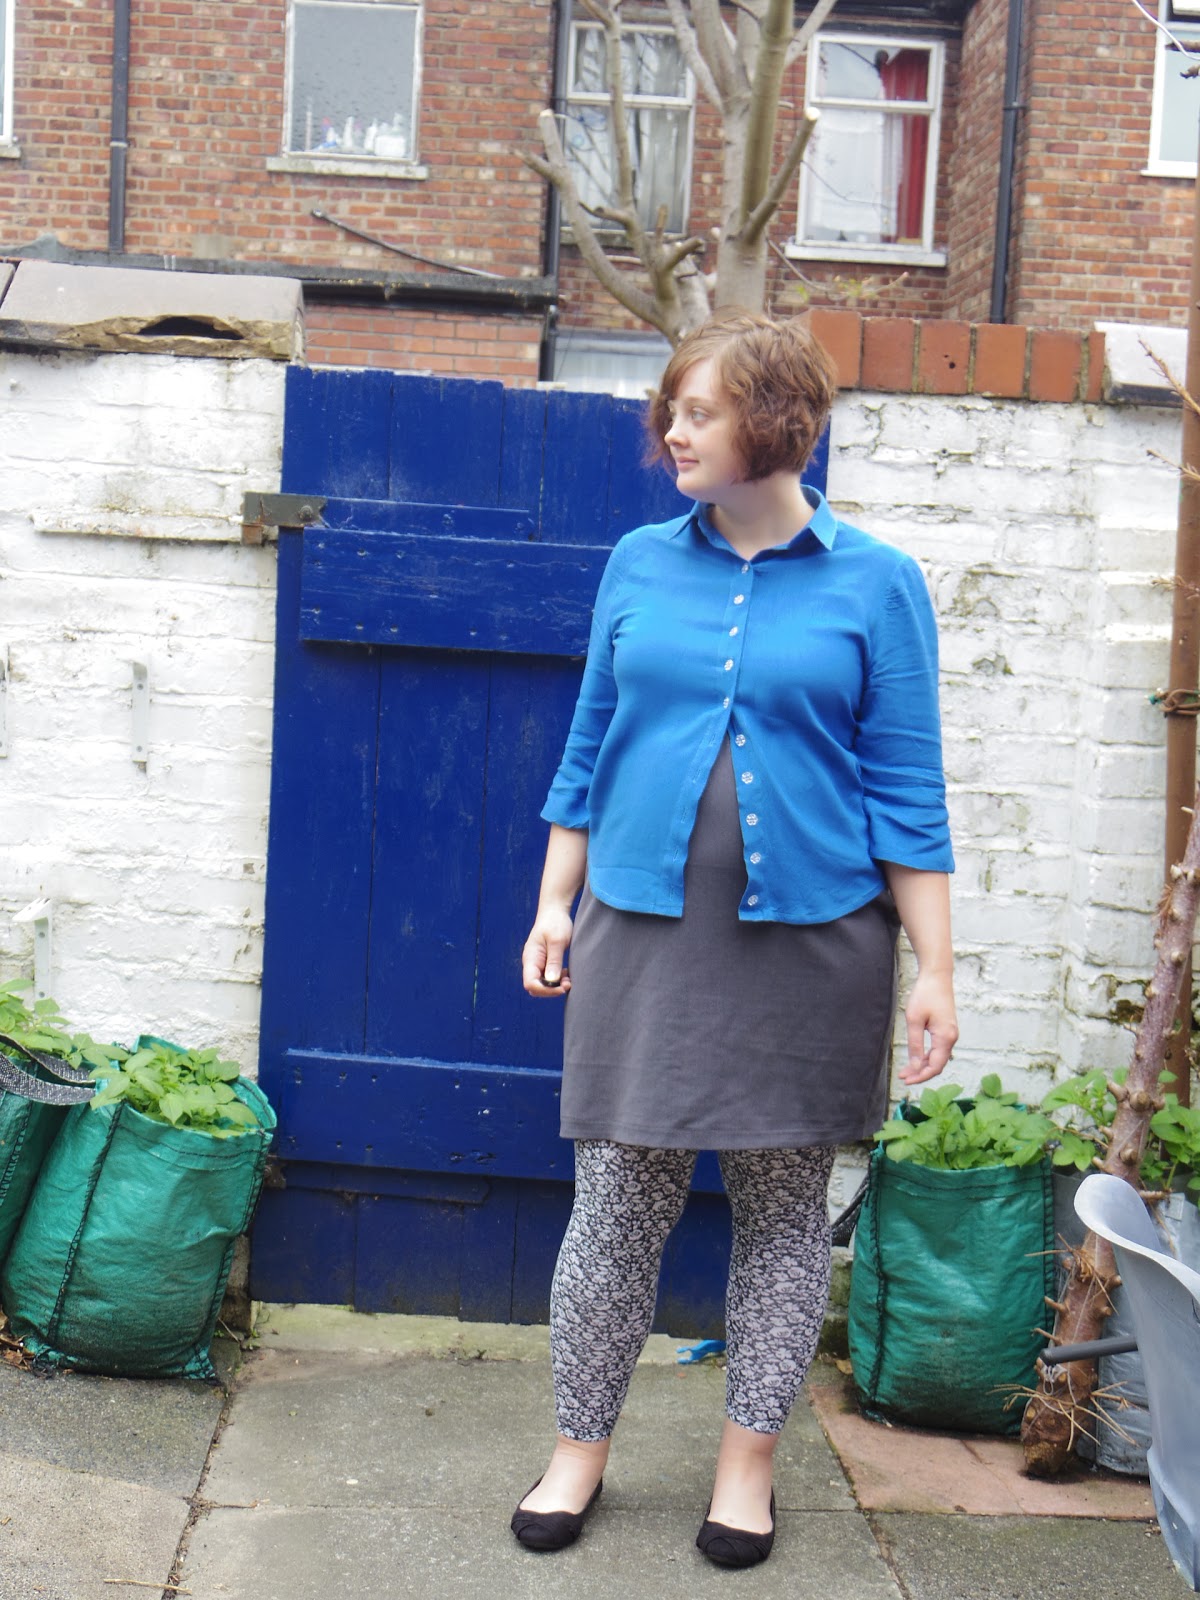
For some reason I look a bit unimpressed in these pictures, but actually I'm pretty darn chuffed! I used the stretch denim that I bought for my simple stretch maternity skirts that are now a bit indecent (I didn't realise quite how high my bump would be... it pulls skirts up rather high! :-)  ). You can't tell in these pics really but it's got a lovely flock pattern. 

It looks in the pattern like there is a placket centre front, but in fact this is a small fold which is topstitched with buttons added. Once it was topstitched, and because I added the button tab detail I decided it looks better plain. I'm sure I'll make another one at some point, I might change this so it's a proper button placket for breastfeeding. 

I went to a workshop about breastfeeding on Monday, and am feeling a little better about it all. My only worry is what I'm going to wear? I wear mostly dresses that don't open at the front, so the double layer vest and top thing would basically mean me getting naked? The two dresses I'm making at the moment I'm ensuring have front openings to try and limit this issue but if anyone has any suggestions (that don't involve me wearing solely jersey for the next six months) I'd very much appreciate it. 


I used the original skirt pieces from the pattern, as I figured it would stretch around the bump, and I was right hoorah! This now means that I have something that has a different skirt to the washi in the wardrobe. I mean I love the washi skirt (clearly) but I am getting a little fed up of having the same silhouette every day, especially as I can't wear my skirts.


When looking at the cover art it appears to be a pinafore, but in fact this is a dress with a a full back. I didn't quite have enough fabric to pull this off so adapted the back to be more like a pinafore, with tabs coming from the back, at an angle so that they would sit well on my shoulders.I also used these straps as tabs, adding in the buttons to complete the pinafore look. It was nice to use up some buttons from the stash. I probably should have ironed this before taking pics, but what can I say? I'm lazy these days. 


.Again I've got that sway back problem like with my last make, but I'm pretty sure this is due to bump and will go away once I'm back to relatively normal. The zip is also separating at the top, so it probably needs a hook and eye.


This picture must be about a month or so ago, so imagine this picture, but bigger and you get an idea of how big my belly is now he he.


The pockets are lined with a white muslin with little red flowers that I've used in lots of projects and now have lots less. After talking about trying to get through my stash, I started the process last week, going through my massive bag of excess fabric that is left over from other projects. I separated out all the cottons that I'm likely to make patchwork/ possible kids clothes from, set aside any pieces of material big enough to make big people clothes from, and put all the wools and heavier materials into a bag under the stairs. This is only one bag of the masses of stuff I've to get through, but I feel better now for having made the first inroads on this massive task. Thanks to everyone for your thoughts on my stash stress. 

Saturday, 27 June 2015

Cami Adaptation Gallery

As promised, you can see below the gallery of Cami shirts and shirt dresses:


Clearly I'm a bit of a fan of this pattern, it's definitely not the last one I'll be making. I love the SewOverIt new shirt dress pattern, perhaps I'll be able to get as much variety out of that too!

Wednesday, 24 June 2015

A & A Cami 3: Shirt Pattern

Good day to you all good fellows. I am back once again from another trip away! What was that people say about resting during pregnancy? Ha ha. No, to be fair these trips have been very restful if not a little sore on the hips. I've worked from home again today so I can recover. 

So I'm back with the last of the adjustment and alteration posts for the Cami pattern. Last week you saw my Cami-Washi hybrid, and I will do a post to show you all of the different iterations of this pattern so far at some point. I hope it goes to show what can be done with one pattern and a few changes. 


Chronologically, after my last Cami shirt I made the Christmas dress that you can take a nosey at here. The one change that I made to the shirt at this stage was to widen the lower half of the armhole. You may remember that in the last installment of A&A I had extended the armhole, so this now fitted well. However, the width across the arm was still tight, especially in the non-stretch of the navy cotton I had used. Therefore I made the following adjustment to the sleeve pattern, 

I began by drawing a straight line down the centre of the sleeve pattern:
I then cut through the sleeve pattern piece, leaving a very small amount of the pattern at the top of the sleeve. This was then used as a pivot point, splitting the sleeve by the amount that I wanted. I ensured that the gap was equal on both sides by measuring the amount from the tip to the base of the split. 

I then re-drew the armsleeve, including in these changes, and removing the angle which was caused at the bottom of the sleeve by the pivoting.

This was a speedy fix and probably caused a bit too much at the bottom of the sleeve, especially on the 3/4 sleeve. This may need a little work if I make another longer sleeved version, but it is perfect for the shorter sleeve. 


I'm wearing the shirt here with the maternity version of New Look 6128, unfortunately it no longer fits. I think I could make another one with a bit of extra pleating, but I've only got four weeks of work left now so I'm not sure if it would be worth it. I'm very happy with the fit of the shirt, though obviously I can no longer close it ha ha. It works tucked in though, and I have some floaty skirts I can wear with it. I made this in a plain fabric for once which I'm proud of. I didn't even add a quick spot of embroidery to it. Very unlike me!


Cat bombed! You can see that the bottom of the shirt has been shaped more like a shirt than the previous version. I laid a shirt that I had in the drawer over the adapted pattern piece, and traced a new version with a little more room in the hip, and the curve at the bottom of the shirt. 

The back of the shirt fits well, though as you can see there are quite a lot of wrinkles in the bottom half of the shirt. I assume this is a sway back issue which needs to be adjusted some more, though maybe it's caused by bump so maybe best to wait before making any changes. 


Here's a little picture of bump, though the usual disclaimer applies, I'm bigger now blah blah ha ha. 


Thursday, 9 April 2015

A&A Cami 2: Widen Armholes

Good evening kind folk!

First off, thank you so very much for all your kind words of congratulation in comments and on Twitter. We are overwhelmed by your generosity! Me and Mr T have been doing our usual dealing with the little stuff, and the big stuff is taking care of itself. Thank you for your luck with the scan, everything looked grand, working organs and everything, I'm not sure how interested you are in our baby's organs... but now you know :-)

The weather has been amazing! We went to Whitby for the weekend, and I brought my thickest Mum knit jumper along as obviously I knew I would freeze. However, I got a sun burn! I know, nothing to brag about, but the first time you are caught out by the sun in the year is always worth a little celebration in my book. Here's me delighted just to be on holiday, however cold. I'm wearing my purple rain mac that I made last year, it's finally warm enough to wear it yay!! It really needs a zip though as half the buttons have popped off due to the inflexibility of the fabric. I'm trying to find a suitable double ended zip, but it's hard work getting one the right colour and size. Any tips?

Just imagine how big my smile was when it was sunny! I'm saving those pics for an outfit post, as I've finally got pictures of the map top I wore in episode one of the Sewing Bee. I've had quite a few requests regarding how this was made, so can't wait to show you the process.


So where were we? I've been taking you through some of the adjustments that I made to the Cami to make myself a standard shirt dress and shirt pattern. We have made adjustments to the shoulder seam, so it should now sit directly on the edge of my shoulder. You can read about this wide shoulder adjustment in my last Adaptation and Alteration post. I was hopeful that this would give me a little extra room in the bodice that would get rid of some of the pulling. However, I knew that the armholes were still tight, so I made an adjustment to widen the armhole. 

You can read a little bit more on this technique here:
1. If you previously cut a smaller size for the armholes, and you can still see the pattern marking for the larger sizes, then just cut along this line. If not, then mark the amount that you want to drop the armhole (I did this in 1cm increments) on the side seam. Using a french ruler copy the curve of the original seam line lower down, matching your mark up with the original curve as you can see in the diagram.

2.  Then you want to extend the side seams on the arm piece to match what you have just taken away from the armhole. I found the easiest thing to do was to re-trace the sleeve piece, then add the amount you need (should be the same as you have taken from the armhole in step 1) horizontally from the end point of the curve on either side of the sleeve. Taper this down to nothing at the end of the sleeve piece. 

So! As the original dress fitted so well, and I had now added so much room to the pattern at this point, I paused. I didn't want to go completely the wrong way and add in too much ease which would then result in a massive unwearable garment. So this is when I decided to make wearable muslin No. 2. 

I don't like the term wearable muslin... it makes it sound like it's a practise run, which I guess it is but doesn't do justice to the amount of work that goes into something like this. I wanted to do something a little different this time, as I didn't want to jump straight into another shirt dress. Therefore this time I opted for a shirt

In order to make a shirt pattern from the bodice, you extend the lines of the bodice out into the length for a shirt. I usually copy a shirt I already have:

1.  I first laid down my pattern piece on the table, I then covered this with see through medical paper which I use for tracing patterns. you can use any paper which is durable enough to withstand being pinned etc but is still see through enough to see the pattern pieces beneath. 

I then laid a shirt that I already owned over the pattern piece that I had made all of the adjustments to so far, matching up the end of the armhole and shoulder seam. I then traced the new hem line and hip angle up to the shirt side seam. I took away the shirt, and traced the rest of the shirt pattern that I had previously made adjustments to. 

You will want to ignore the bottom dart, but add in the bust dart to provide some shaping to your shirt.

2.  Using a ruler, follow the placket lines down from the pattern piece to the new hemline. Also you want to smooth out the harsh edge where the bodice and the hip line meet. You can do this by eye, or with a french curve. 

Hopefully you will now have a fully altered pattern piece to make a shirt with! Phew! With this pattern I made the Fantastically Generous Bloggers Shirt that you can see here! 


There is a lot more room for manouvre in this, but it still has its issues. The least of these issues being that it has now gone in the cupboard as I can't fit Bump into it anymore. But let's not dwell, there's plenty of time to deal with any further changes to be made in the next installment! I hope you're finding these posts useful, I always enjoy reading more in depth about the fitting process that someone goes through, as it reminds me that we don't all fit straight out of the envelope, and that there are fixes out there for these issues. 

I've got a weekend to myself this week, and I can't wait to sink my teeth into a more in depth sew. However, I really should make some more stretchy work skirts. Lets see whether head or heart win ey? You can follow me on instagram to get more up to date posts on what I'm doing right now @dfabricater.

Friday, 12 September 2014

Christmas Party Pastille Dress


Crikey, this post has been a long while in the making!

I received the Colette sewing handbook last Christmas from my Grandma. It was an absolutely brilliant pressie as I learnt a lot reading through the pages, but the colour palette in the book, along with some of the rather fitted/ floaty sleeve-ness of the patterns made it a little difficult for me to visualise myself in any of them.

When I was thinking of making a dress for my works' Christmas party I thought it would be a good excuse to give these patterns a try, and the pastille on the front cover caught my eye. I liked the subtle sweetheart neckline (not the bow... too twee for me) and the sleeves which aren't a separate piece, something I hadn't done before. I knew such a fitted straight skirt would not be a good look on me, though I did swap out the skirt for a straight one in for my stars in their eyes dress. However, looking closely at the picture I could see that the skirt was a separate piece from the natural waist, so it would be an easy job attaching a skirt I liked.

I used the digital rose print fabric I picked up at the Birmingham blogger meet-up, and fully lined the bodice.


I decided to make a muslin of the bodice for safety, and found that something strange happened when I calculated the sizes. I had to cut out a size 6-8  shoulder/ bust but a 14 waist? I think I did a calculation wrong as when I tried this on it was all kinds of wrong, I then cut an 8 waist (in fact I trimmed it to a 12, then a 10 and then an 8!)

Even after I had done this the triangle darts did not work on my body (lucky this was a muslin!) I then pinned the darts closer to my body to fit as I wanted, and I ended up with a close fitting bodice, and half moon darts. Has anyone else ever ended up with rounded darts? Is this a thing?

I used the muslin as my lining, and made the following dress. I finally got round to taking pics of it last weekend! That's a whole 8 months ha ha ha.


I put on a bit of weight after Christmas , and the wedding, and holidays... so this dress became a little bit tight. You can still see in the back it could probably do with a teeny bit more ease, but I've lost most of this weight now so I'm not worrying about it.


I took these pics with my shiny new Pentax Q10, which is somewhere between an SLR and a standard digital. Having no knowledge of how to use the SLR (and no real inclination to learn) was infuriating, so Mr. T got my this for my birthday, it feels a lot more manageable. There are still a lot of settings, but I'm not feeling overfaced any more which is good.

I've taken another whole bunch of pics, so expect some more regular viewing for the next few weeks.

LinkWithin

Related Posts Plugin for WordPress, Blogger...